Step-by-Step Guide to Applying Fence Sealer Like a Pro
Maintaining the beauty and durability of a wood fence requires more than just occasional cleaning—it demands proper protection against the elements. Applying a quality fence sealer is one of the best ways to safeguard your investment. Whether you’re caring for a wooden fence or maintaining other materials like an Orlando aluminum fence, understanding how to apply sealant correctly will help your fence stand the test of time. Here’s a simple step-by-step guide to sealing your fence like a pro.
Step 1: Choose the Right Time and Weather
Proper timing is crucial for an effective fence sealing. Plan to apply the sealer on dry days with moderate temperatures, preferably between 50°F and 85°F. Steer clear of windy conditions to keep dust and debris from settling on the fresh sealer. Also, make sure no rain is forecasted for at least 24 to 48 hours after application to allow the sealer to cure properly.
Step 2: Prepare Your Fence Thoroughly
Before sealing, your fence surface must be clean and dry. Start by removing dirt, mildew, and old peeling paint or stain. Use a power washer or scrub with a stiff brush and a fence cleaning solution designed for wood. Rinse well and let the fence dry completely—this could take a day or more depending on the weather.
Inspect the fence for any damage such as cracks or loose boards and make necessary repairs. A smooth, intact surface ensures the sealer will adhere evenly and protect effectively.
Step 3: Choose the Appropriate Fence Sealer
Select a high-quality fence sealer suitable for your fence type. Clear sealers preserve the natural look of the wood, while tinted options add color and UV protection. Consider water-based sealers for quick drying and low odor, or oil-based for deeper penetration and longer-lasting protection.
While this guide focuses on wood fences, remember that other fence types, like an Orlando aluminum fence, require different maintenance routines and do not need sealers.
Step 4: Protect Surrounding Areas
Apply painter’s tape or plastic sheeting to protect nearby plants, walkways, or structures from accidental drips or overspray. Wearing gloves and protective clothing is also recommended for your safety.
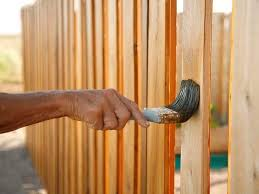
Step 5: Apply the Sealer Evenly
Use a brush, roller, or paint sprayer to apply the sealer. A sprayer can speed up the process and reach tight spots, but brushing ensures better control and penetration into the wood grain.
Begin sealing at the top of the fence and move downward to prevent drips from flowing onto areas you’ve already treated. Apply thin, even coats rather than thick layers to prevent peeling and uneven drying.
Step 6: Allow Proper Drying Time Between Coats
Most fence sealer recommend applying two coats for optimal protection. After the first coat, let the fence dry completely—usually 24 hours—before applying the second. Follow the manufacturer’s instructions for drying times.
Avoid rushing this step, as improper curing can compromise the sealer’s effectiveness and the fence’s durability.
Step 7: Clean Up and Inspect
Once finished, clean your tools immediately with water or appropriate solvents. Remove any protective coverings carefully.
Inspect your fence after the sealer has fully dried to ensure complete and even coverage. Touch up any missed spots to guarantee thorough protection.
Final Thoughts
Applying a fence sealer doesn’t have to be intimidating. By following these steps, homeowners can protect their wood fences from moisture, UV damage, and general wear, significantly extending their lifespan.
Remember, while a wood fence benefits greatly from sealers, materials like an Orlando aluminum fence have different maintenance needs that focus more on cleaning and rust prevention. Knowing how to care for your specific fence type will keep it looking great and functioning well for years to come.


Leave a reply